Outdoor Lighting
Posted: August 18, 2014 Filed under: Work in Progress | Tags: Lighting Leave a comment
Front Entry Lighting
For the front entry we just installed some big halogens up top in the timber-framed structure. They point up and light bounces off the ceiling and back down. It gives a nice effect from the street, and lights up the entry.
Out back I installed 15w low voltage pucks (like the under cabinet lights – but brighter). Considered LEDs for this – but the price was pretty steep, and the halogens are dirt cheap.
There are 16 of them, spaced on a 4′ grid. The picture doesn’t really do the lighting justice …. they really light up the area. It worked out perfectly.

Rear Patio Lighting
Kitchen
Posted: August 16, 2014 Filed under: Work in Progress | Tags: Kitchen 2 Comments
Base cabinets are laid out for install.
For the kitchen we decided on a custom design.
I did the design work myself. The style is based off of a few different things I saw on Houzz, but mostly from a kitchen designed by an architect named John Lum (http://johnlumarchitecture.com/). Hopefully he won’t mind my using his styling details!
They are VG Fir (Vertical Grain Douglas Fir), made from veneered plywood. I was going to build the cabinet boxes myself, and source the doors – but we ended up finding a local semi-custom cabinet builder who gave us a good price on boxes and doors – so we went that route.
This initial set of cabs does not include the island – because at time of design we were still a bit uncertain of exactly what type of island would want.

Another view of cabinets as they are installed.
Anyway, all the cabinets went in during October, and then counter, sink, plumbing, appliances and backsplash. It was all in place in time for Christmas 2014.
Since the floor is totally finished we had to cover it with cardboard to prevent scratches and stuff. Installation is pretty straight forward: first we find the high spot (on the floor) and install that cabinet, and then use levels and shims to get everything else lined up.
I had photos of all the walls before drywall, so we knew exactly where it was good to screw into etc etc..

Cabinet installed around fridge, and you can see a pantry on the left which was in place (it was a bit tricky to get there because there was only 0.5″ clearance at the top, but they have to be raised in to position – and at an angle the cabs are higher than the ceiling!

This is a top view of the base cabinets. You can see there is a filler piece on the front to give the desired look. We have to put other support blocking in place to support the counter top.

The complete cabinets, installed, with pulls, counter top, and steel backsplash. No island yet … it will come soon!

Here is a view of the kitchen after installation.

Another view after installation.
A Milestone Reached: Outdoor Structures Painted
Posted: December 28, 2013 Filed under: Work in Progress | Tags: stain Leave a comment
Here we have the back yard outdoor room, fully stained and ready for rain and snow!
So our priorities for the fall were:
- get all the outdoor wood stained, so it would be protected come winter
- install the kitchen, so we can cook and so we don’t have to wash dishes in the bathtub
- get lighting in the house (downstairs) so we can see each other
I will talk about kitchen and lighting in other posts. In the front we have the cedar entry and the large pergola over the deck. These are to be stained with Broda – same stuff as window trim. I figured it would take a week of evenings.

Lots of posts and beams and corners and crevices to paint!
You can see that there are a lot of corners and crevices … so I set up scafolding and gor to work. This was when Rob learned the true value of pre-staining!! All this t&g on the ceilings was ridiculous! I had to get little brishes into every crack! Of course I could have sprayed it and brushed it out after – but this stuff is pretty fussy – you need to apply it thick and let it soack in , then brush away the excess. Anwyay, it took way longer than expected – maybe a month of evenings for all the front and back.
The weather didn’t help. Fall in Vancouver brings lots of changes from warm to cold – and it started getting dark early. Work lights helped – but I didn’t want to work too late as there was lots of dew after it cooled for the night.

This is the rear deck, with posts in Cetol 077+085. Ceiling is 078.
Anyway – it all got done.
Oh – for the back deck we used a different product – Sikkens Cetol 1 (base coat). It is on Fir, not cedar, so we used a tint to get a similar hue to out front … first coat was Cetol 1 – 077 Cedar. It has a bit of a yellow hue, so the second coat was 085 Teak – which is more orange.
It came out quite nice imho. The yellow cedar on the ceiling is just 078 Natural.
We can do Laundry!
Posted: December 28, 2013 Filed under: Work in Progress Leave a commentSo one of the major milestones was to be able to do laundry again! This happened sometime after we returned from Newfoundland. I can’t remember when exactly – but as you can see, there is lots of laundry!
[correction – Kathy tells me it was July 1st when it was hooked up – before we left for Nfld! … I am a bit late with this post I guess!!]

The laundry room. We stacked the W/D to save space as it is not a huge laundry room. There are some old cabinets and a micro etc in here now – just temporarily. The plan is to complete the kitchen and bath and then come back and install cabs in this room.
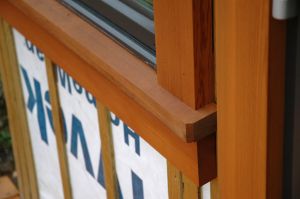
Window Trim
Posted: December 28, 2013 Filed under: Work in Progress | Tags: cedar, stain, trim 1 Comment
Front of house. Window trim installed and stained.
The last thing we worked on in the summer was the window trim. I wanted to use clear wood (no knots) to border the windows – and Douglas Fir was the wood of choice. The problem: cost! It is next to impossible to get ‘clear green d-fir’. It is either construction grade Fir, or kiln-dried.
I suspect that most builders who want a natural wood finish use the kiln-dried lumber. But this was really a non-starter for us. It would have cost a small fortune.
So I went out looking for alternatives. It turns out that the lumber yards do sell a lot of ‘clear green cedar’. Note that the species is ‘Western Red Cedar’ – ‘clear’ means that it has no knots and green means that it has not been kiln dried. People use this stuff for decks and backyard projects. It is expensive – but not nearly the cost of kiln dried clear Douglas Fir (eg: one 8′ 2×6 Clear Green Cedar plank is approximately $25; the same board in kiln dried Fir is between $50 and $100 – depending on where you get it; the standard window trim (primed, combed face spruce) that the builder of spec houses use would cost about $12 per board). And I need a lot of this stuff. Like 800 linear feet or more for the entire house.

The first window is trimmed.
Anyway, I decided to go the ‘clear green cedar’ route, as it will give a nice natural wood look. More costly than painted trim (double) … but it should look nice.
Next challenge: getting the wood.
I went around to all the lumber yards trying (a) to get a good price, and (b) to get nice product. Turns out that everyone has basically the same pricing – but there was a huge difference in quality. For example, some say ‘clear’ – but their wood is full of knots. There is also a very different look depending on how the board is milled. Some of them show the flat grain on the face – and other show the edge grain. I much prefer edge grain. So what I ended up doing was to go to a lumber yard and hand picking all the nice straight, clear, edge grain boards – and taking them home. I could get maybe 15 to 20 boards from one supplier. Then I had to wait a week so for people to buy the other <less desirable imho> boards, so they would re-stock. Then I go back and take all the nice boards again. I have to look through every bundle of boards and hand pick the good ones. Takes some time … but I am getting pretty goof at it now … I can look at the end grain and color/hue of the board and I can tell pretty accurately which ones will look nice (of course they are typically at the bottom of the pile) – then I re-stack the entire pile to get the boards I want.

Bottom Floor Trim Complete
Hmmm. I wonder why this job is taking so long!
Next Decision: Stain
I want to pre-finish the trim, and I had decided to use Broda SLT for the boards. Previous color experiments on the deck helped me zero in on color 112 (Woodlands). After a few trials I decided that two coats SLT + 1 coat of their clear topcoat was the preferred way to go … gave the right color depth and not too much sheen.
Milling the Window Trim
There are three basic profiles that I need to cut (table saw is used for all this).
- straight flat boards (for vertical trim)
- sills (ledge under the windows)
- horizontal trim (above windows and under sills
In this photo you can see the three different profiles that need to be cut.

Also, the boards all have planner marks from the saw mill. It is easier to re-plane them to get rid of the marks than to sand them out. Of course I still have to sand them a bit – as any planer leaves ‘mill glaze’ – which prevents stain from penetrating.
So my process is something like this:
- plane boards to get rid of planer marks from saw mill
- cut planks to correct profile on table saw
- sand to remove mill glaze
- apply 2 coats stain
- install (cut to length, level/align, nail in place)
I started on this two or three weeks before we were to leave for summer vacation – with a goal of completing the trim for the entire house. Everything went fine for a few days – until I washed off a part of the front wall in preparation for installing some trim. At that time I noticed that the stain on some of the previously installed boards had ‘run’. It was like the stain did not dry properly and was washing off!
Arghh!

Close up of trim around upper floor windows.
Stop the presses – press reset – hit the panic button … (whatever you do!). I have maybe a quarter of the front installed and another batch stained and ready to go on … but I can;t really go forward with this if the stain is defective!
I grab a board, jump in the truck, and head in to see the paint supplier. End up talking with the president of their company. They do a bunch of tests and decide that the problem has to do with the acidity of the Red Cedar. Apparently it affects the chemical reaction that is needed for the stain to cure. Note that this is not a typical oil based stain or a film building varnish type product. It is water based and is supposed to soak into the wood, then the water evaporates and there is a chemical reaction that makes the stain bond with the cells in the wood. One benefit of this product is that you can put it on when the wood is wet (aka – green). This is one of the main reasons I chose the product – my wood is ‘green’ – and I can’t wait for it to dry before staining it because it rains too much out here – and the tannins in the cedar leave ugly marks on the surface of untreated wood when it gets wet.

Yes, lots of sample colors and stain types were tested.
Anyway – the Broda stuff isn’t working. They suggested two things … (a) take the wood outside <I was preparing it inside> to dry after staining, as the UV helps the reaction, and (b) pre-treat the wood with a strong ‘basic’ <as in the opposite of ‘acidic’> solution. The dude gave me a tub of potash, and instructions on how not to get chemical burns.
Of course the problem is not really so simple. I am sitting there looking at maybe $500 of wood that needs to be re-stained. I try and variety of things, but in the end I just stuff it all through my planer again, and re-sand, and re-stain.
It dries this time – thank god!
Total delay – probably 1 week.
In the end I only get the trim completed on the front of the house before vacation.
A New Roof
Posted: July 26, 2013 Filed under: Work in Progress | Tags: ants, roof Leave a comment
The old gravel (and moss) was first shoveled off the main roof onto the garage. Then it was shoveled off the front of the garage into a disposal bin below. Good thing we built that garage to be strong (at one point there was probably 3 yards of gravel on a pile in the valley between the garage and the entry.
Weather has been great here so we finally got the roof replaced. Our house has an almost flat roof – it would be like a 1 in 12 or something (1 foot rise for 12 feet of run). The previous roof was tar & gravel. The new roof is a torch on membrane – much nicer and cleaner.
We thought that the old roof had a couple inches of insulation, but it didn’t – just a layer of donnacona board – like that is going to do anything to keep you warm! In the new roof we installed 2″ for foam isoboard. This will help!
At the same time as the roof was done we replaced all the fascia boards, roof flashing, and vent stacks (anything that goes through the roof membrane). Owen re-pointed the chimney and will help with gutter and downspouts, and I pulled new wires to the upstairs fixtures that we wanted to change from 12v to 110v.

Some fascia boards are cut to length for installation.
Finally – one of the most important things (to me anyway) – we eradicated the carpenter ants that were living in the roof! This has been a major problem for us ever since we moved into this house, and it took almost 10 years (and many pest “experts”) before I finally figured out that the little buggers were living in the roof, in the donnacona board the is sandwiched between the tar and gravel and the 2×8″ yellow cedar roof strapping. This was the fun part … I was prepared (as I new they were in the roof) … I had the shop vac on the roof, plugged in, and on standby! As soon as we tore off roofing and found a nest the vac went on and we cleaned out the entire nest. There were only two nests – but they were big – about 6 or 8′ long. two inches deep, and maybe 4 inched wide. Hundreds of ans in each nest. Anyway – we got them all!

The roof when it was completely stripped. It is in very good shape! Note the electrical wires that are just run along the surface.
The good thing was that there was absolutely zero damage from the ants. They liked the donncona so much they just nested in that – and didn’t even touch the structural wood.
Fascia’s were another story … they were extremely rotten, especially at all corners and seams. Doesn’t matter any more though, as they were all replaced.
Anyway … the pics show the new roof going on.

The new roofing materials.

Insulation (iso boards) are tacked into place.

This photo shows the first two layer on the right side. First a felt goes down, then the first torch on layer. Note the unattended flame thrower!

Miguel adds the third (and final) layer.

The finished roof.
Status Update
Posted: June 26, 2013 Filed under: Work in Progress Leave a comment
Samantha stains the front deck. It is all 5/4″ cedar decking. Stain is from a company called CBR Broda – they make a new zero VOC stain that is environment friendly.
Just a quick status update … we have been working on a bunch of little things, but mostly paint. Stained the deck, painted laundry room, painted ceilings, closed in boiler room wall.
Today we will start on exterior pre-clad (flashing, rain screen etc).
For those who don’t know what ‘rain screen’ is, here in the Pacific Northwest the new building codes require that the exterior walls be 100% water tight before siding goes on. Then you have to add spacing (like 1/2″ thick strips of wood) so that water can drain out IF it happens to get through your siding. Major pain-in-the-butt if you ask me! It is especially frustrating when you know it will add a couple thousand dollars to the project, and water will NEVER get on the wall (we have been living here long enough to know where the rain hits / does not hit, and with 40″ overhangs rain does not hit the wall!).
Anyway … time to run out to the lumber yard!

Kathy vacuum’s up drywall dust. What a mess that was! Thankfully Kathy is a pro with a vacuum (it is the one power tool – aside from the washer/dryer – that I still can’t figure out!).

Nicky and Sam wash gyproc mud off the floor.
Gyproc
Posted: June 16, 2013 Filed under: Work in Progress | Tags: drywall, gyproc, ramboard Leave a comment
Welcome to our mess!
Gyproc is messy! We were warned in advance of this – so we made sure to cover the floor completely. Unfortunately with concrete it is best to make sure that whatever it is covered with is breathable, otherwise you can end up with lines and shadows where tape or poly overlap.
The building supply places sell rolls of pressed cardboard – which they call Ram board. We bought 4 rolls and cut it up and laid it out to cover the floor. Good thing we did this – as you will see in the photos below!
Pergola
Posted: June 16, 2013 Filed under: Work in Progress | Tags: beams, pergola Leave a comment
Here is the pergola front view as submitted in the design drawings.
Last week Ryan and I started work on the front pergola. Here is what the plan showed us constructing.
There were a number of decisions to make as we went along, such as how to connect things together, how much overhang to leave, elevations for beams, etc..
Below is a series of photos showing the work as it progressed.
All that remains is to finish connecting some of the upper beams (2×6’s) and to put the decking down.
Father’s Day Off
Posted: June 16, 2013 Filed under: Life During Reno Leave a comment Click to open the father’s day card from Nicole …
